Author: admin

  • Create A cloud site.

    Create New Cloud Account


    1. Log into cloud.myepos.com using the username & password provided

    2. Click “Datasets”

    3. Click “Create new Dataset”

    4. Enter the site name

    5. Click “Yes” on enabled

    6. Click “Yes” to allow additions

    7. Click “Yes” to allow overrides

    8. Click “Save” This will take a few mins as the dataset is created

    9. Now go to sites & tills and click “Create new Site”

    10. Enter the name of the site

    11. Enter the short name of the site

    12. Choose the dataset created in the previous step from the dropdown

    13. Add in the correct number of tills and name them

    14. Choose which till is the master which will receive changes

    15. If the site is using cloud shelf labels change this setting to “yes”

    16. If the site is to be included in reports change this setting to “Yes”

    17. Click “Save site”

    18. Click “Close”

  • Create an Item

    Create an Item in MyEPOS

    This guide provides a step-by-step process for adding a new product efficiently, making it an essential resource for anyone looking to streamline inventory management. By following the detailed instructions, users can ensure that all necessary product details are recorded accurately, including supplier information and pricing options. Additionally, the guide highlights important features like stock calculations and allergen notes, which enhance product safety and compliance. Overall, this guide is invaluable for optimizing the product entry process in a retail or food service setting.


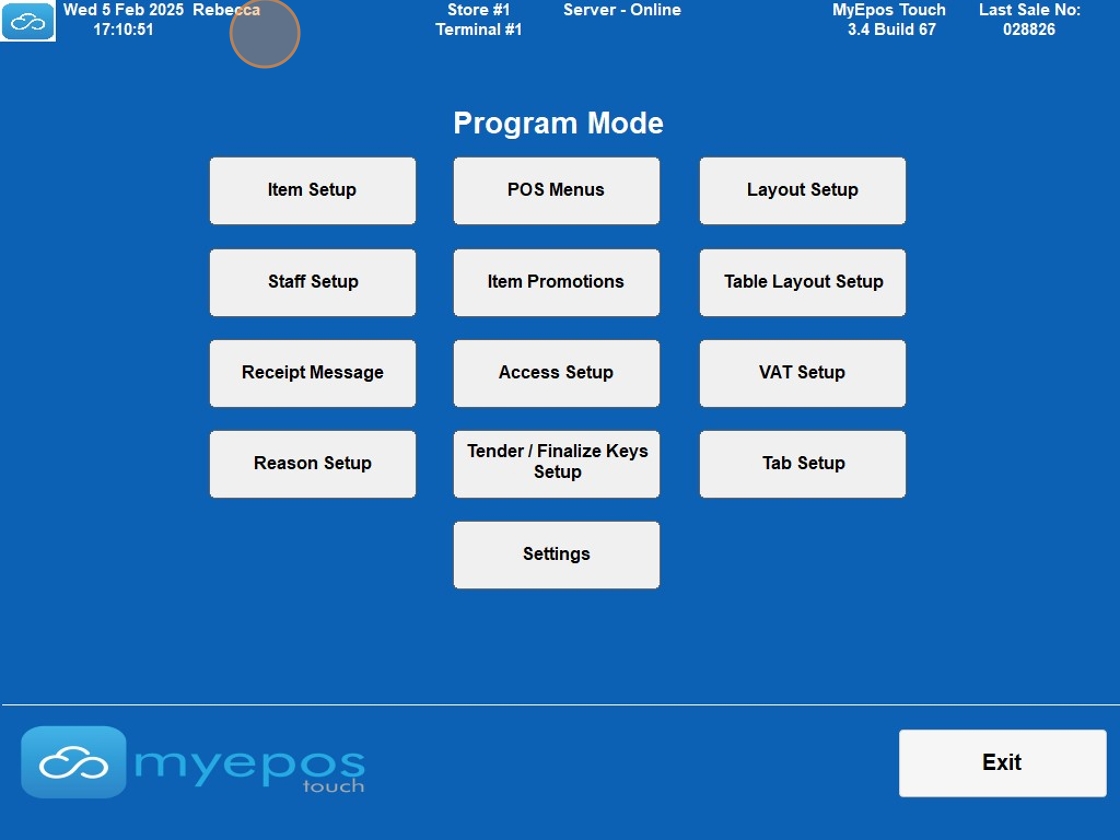
    1. In program mode choose “Item Setup”

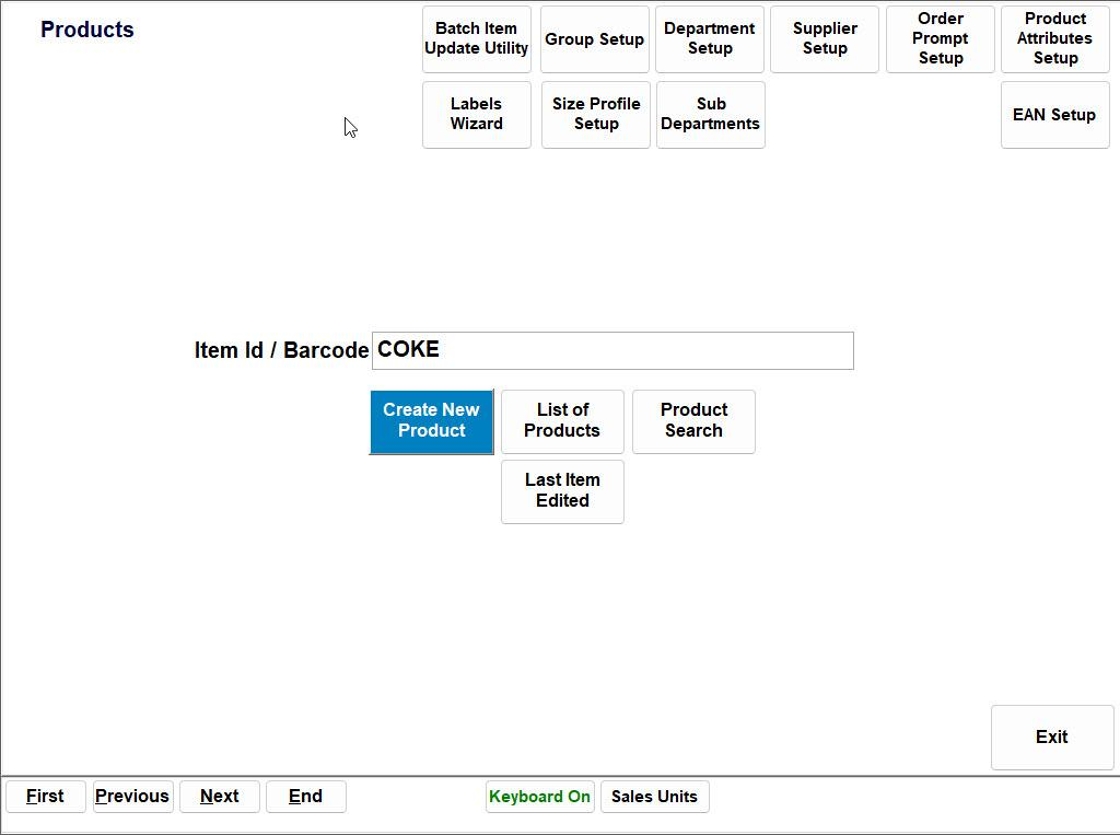
    2. Click “Create New Product” or for retail environments scan the barcode.

    3. Click “Ok”

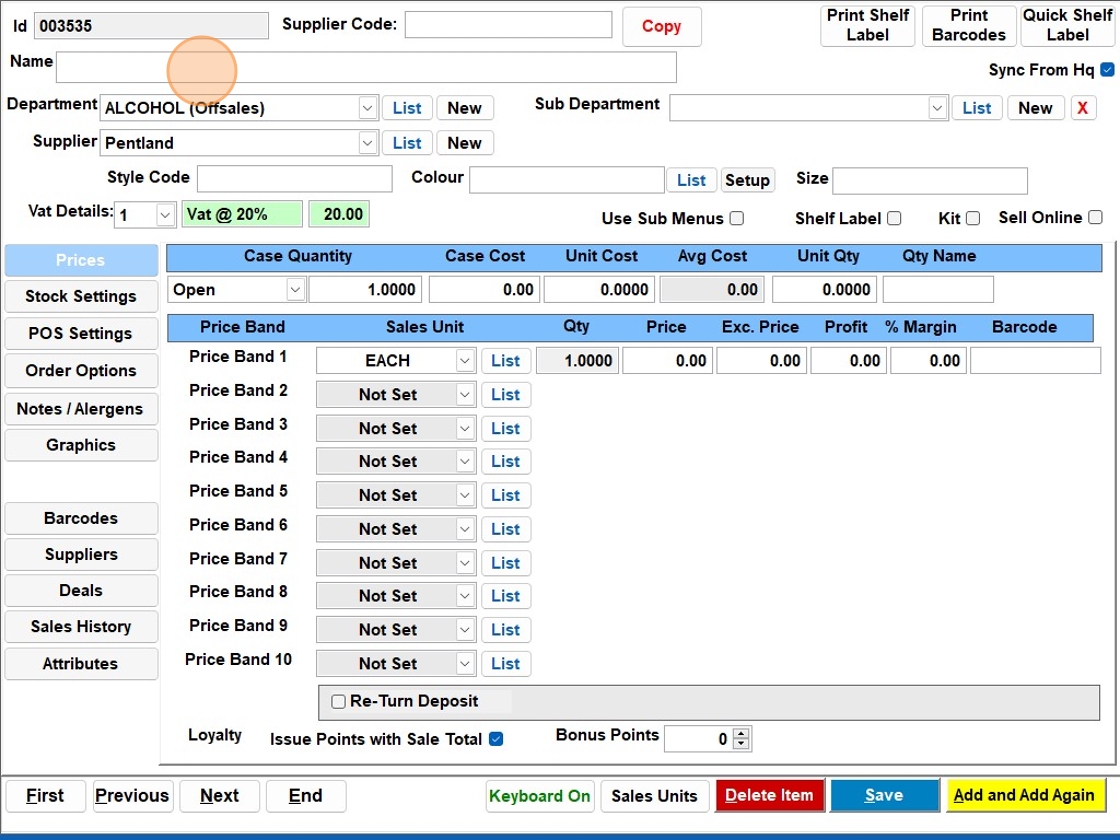
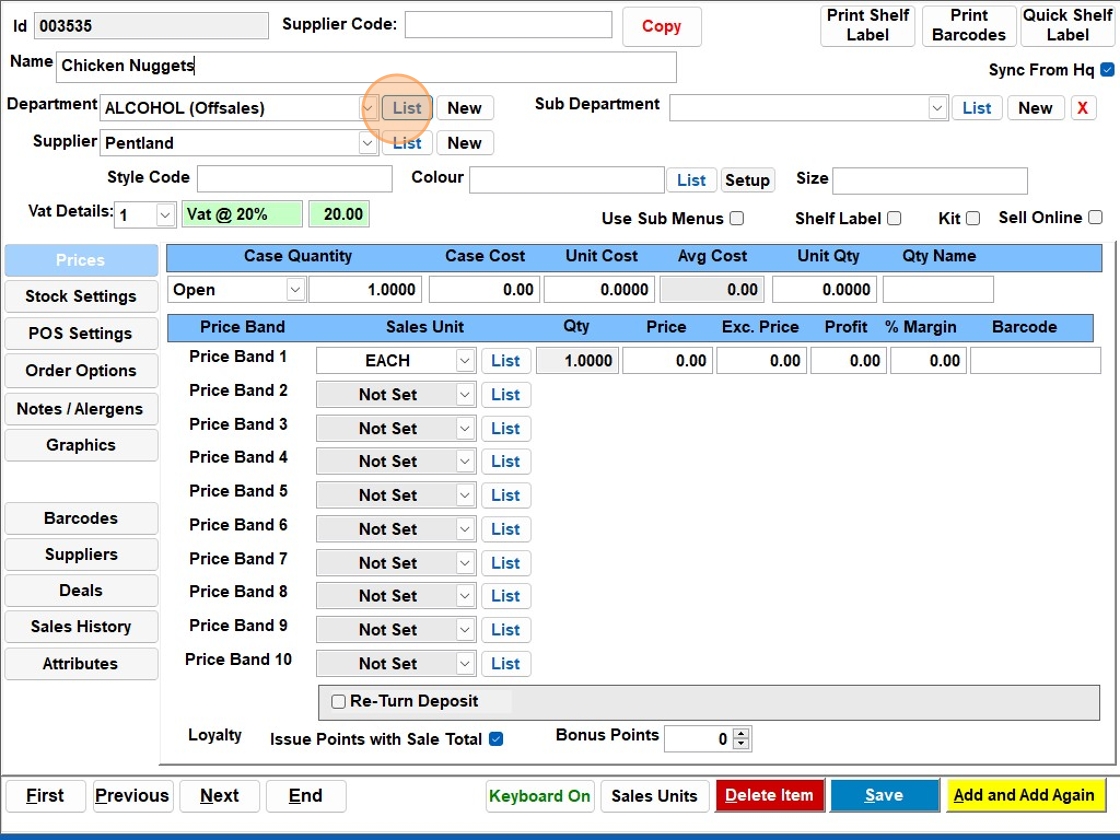
    4. In “Name” Enter the name of the item

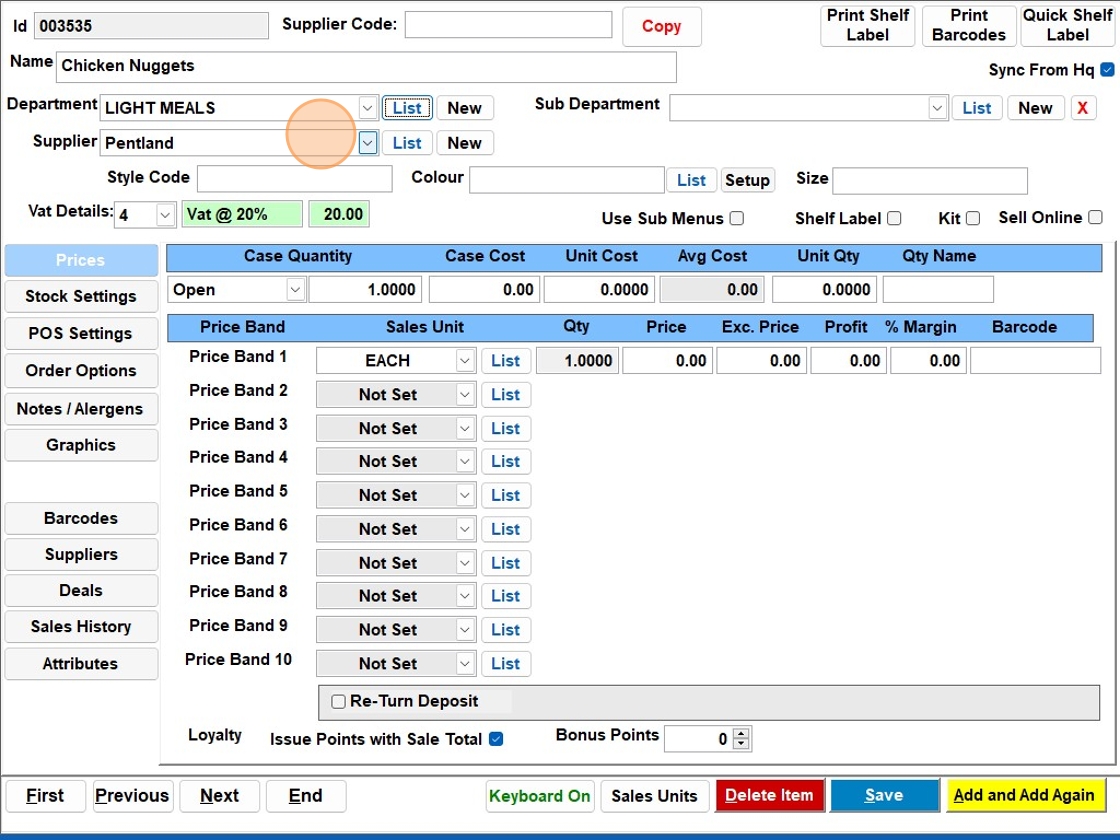
    5. Choose the appropriate department.

    6. Choose the supplier (if applicable)

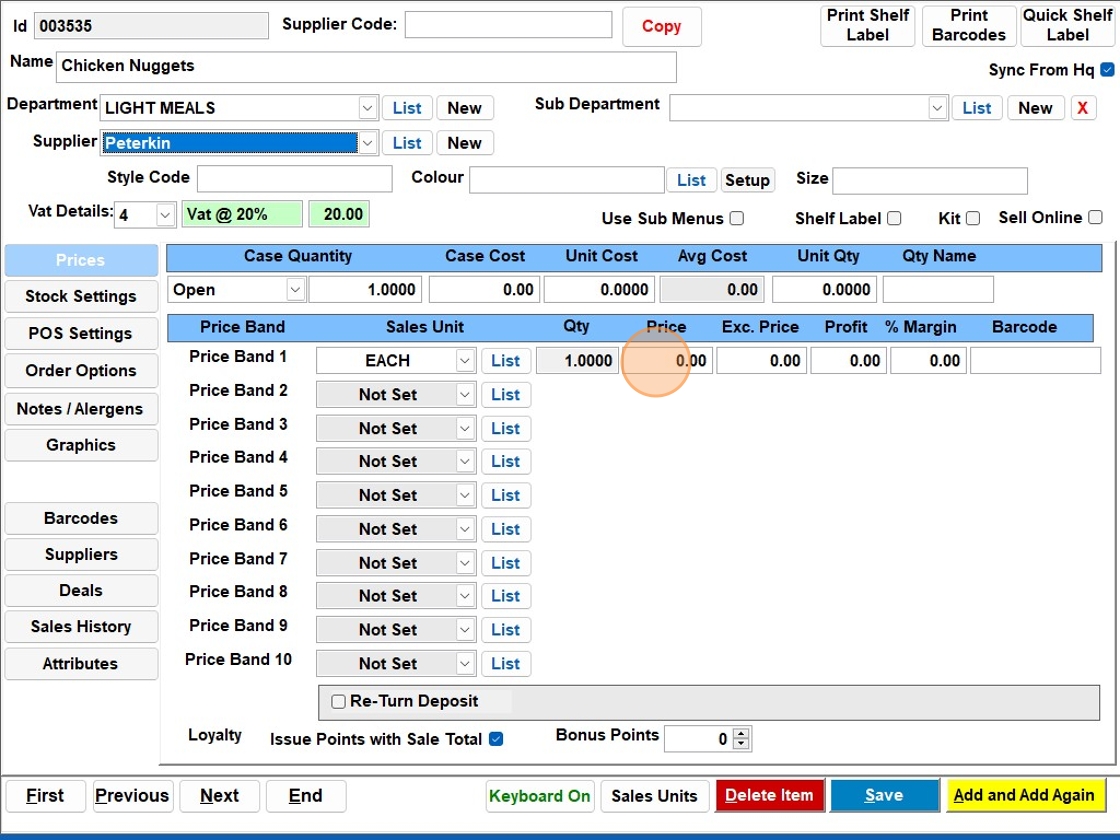
    7. Click the “Price” Field and enter the price for the item

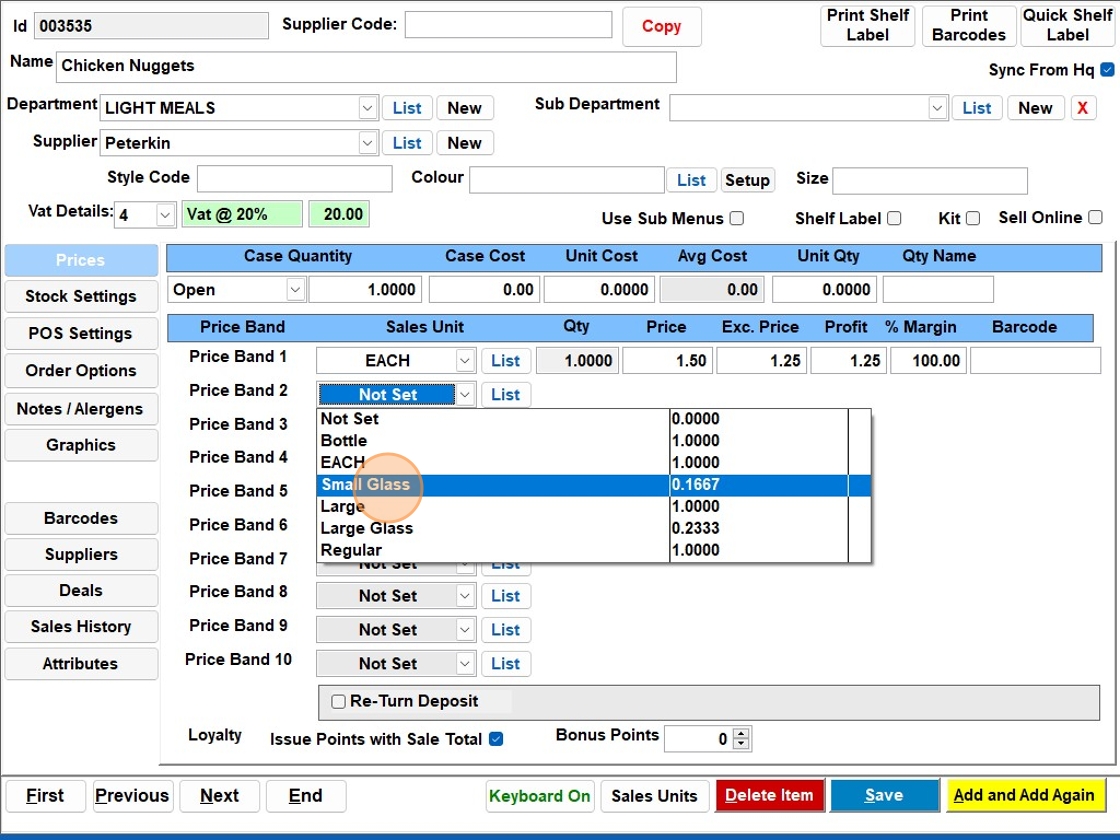
    8. You can amend the sales qty here or add additional ones

  • Edit an Item

    Edit an Item in MyEPOS

    Instructional guide for amending an existing product in MyEPOS


    1. In program mode choose “Item Setup”

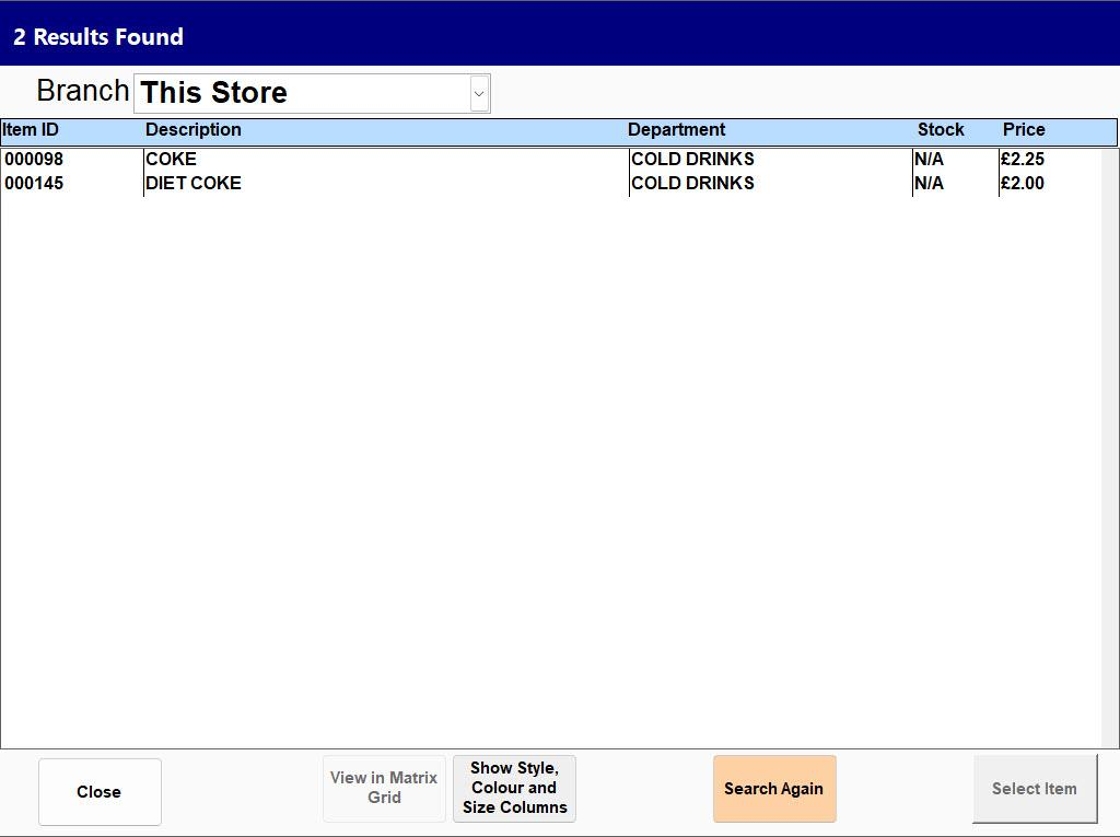
    2. Search by name or barcode for your existing product.

    3. Choose the item you wish to edit from the list.

    4. In “Name” enter the name of the item

    5. Choose the appropriate department.

    6. Choose the supplier (if applicable)

    7. Click the “Price” field and enter the price for the item

    8. You can amend the sales qty here or add additional ones

    Tip: You have now created a simple item and it will be good to sell!
    The below steps are additional customisations that you may require.

    9. Stock Settings

    10. With “Calculate Stock” selected the system will track the stock of your item.

    11. POS Settings

    12. Price Shifts:
    This is where you can set any specific price shifts for the item. Please see guide on price shifts for additional resources.

    13. Questions:
    This is where you can set any questions for the item. For example, “Is the customer over 18?”

    14. Disable Product:
    With this ticked the product will not appear on any menus on your system.

    15. Course Product:
    With this ticked the product will be marked as a course item (ideal for products linked to others).

    16. Indicate VAT:
    With this ticked the product will show a VAT breakdown when sold.

    17. Disable Product:
    With this ticked the product will sell as a weighted item.

    18. Always Print Scale Label:
    With this ticked the product will print a scale label every time it is sold.

    19. Print Ticket:
    With this ticked the product will print a ticket every time it is sold.

    20. Generate GS1 Barcode:
    With this ticked the product will generate a GS1 Barcode for the sale of the product.

    21. Always Prompt for Price:
    With this ticked the product will ask you to enter a price every time you sell it. (Ensure no price is entered in the main product record.)

    22. Negative PLU:
    With this ticked the product will sell as a negative figure.

    23. Disable Discount:
    With this ticked the product will be unable to be discounted.

    24. Exclude From Promotions:
    With this ticked the product will be excluded from any promotion.

    25. Click “Order Options”

    26. Order Prompts:
    Here you can select any order prompts you wish to show when the item is sold (e.g., steak cooking).

    27. Kitchen Printing:
    Here you can select which printer the item should print on when sold.

    28. Notes / Allergens

    29. Allergen Table:
    Here you can select any allergens for the item.

    30. Notes on Item:
    Here you can add any notes for the item and choose if they are displayed to the staff or on the TFT Display.

    31. Comment 1:
    Here you can enter any relevant information (e.g., for a WordPress integration, you might enter the product SKU to link systems together).

    32. Graphics

    33. Here you can add any images for the item. You have a choice of:
    – Button Image: Graphic displayed on the keyboard.
    – Item Image: Image displayed on the main till system when the item is sold.
    – TFT Image: Image displayed on the TFT customer display when the item is sold.

    34. Click “Save”

  • Add an Item on the Cloud

    How to Create New Products on Cloud

    This guide provides a straightforward walkthrough for creating new products on the Cloud platform, ensuring users can efficiently navigate the process without confusion. By following the detailed steps, anyone can quickly learn how to add and manage product listings, which is essential for business operations. It’s an invaluable resource for both new and experienced users looking to streamline their product management.


    1. Click “Items”

    2. Click “Products”

    3. Click “Create new Products”

    4. Insert the item name

    5. Choose a Tax Rate

    6. Choose a Department

    7. Choose a sales qty

    8. Enter an item price

    9. Click “Save”

  • Edit an item on the Cloud

    How to Edit Products on Cloud

    Instructional guide for amending an existing product in MyEPOS


    1. In program mode choose “Item Setup”

    2. Search by name or barcode for your existing product.

    3. Choose the item you wish to edit from the list.

    4. In “Name” enter the name of the item

    5. Choose the appropriate department.

    6. Choose the supplier (if applicable)

    7. Click the “Price” field and enter the price for the item

    8. You can amend the sales qty here or add additional ones

  • Create a Promotion

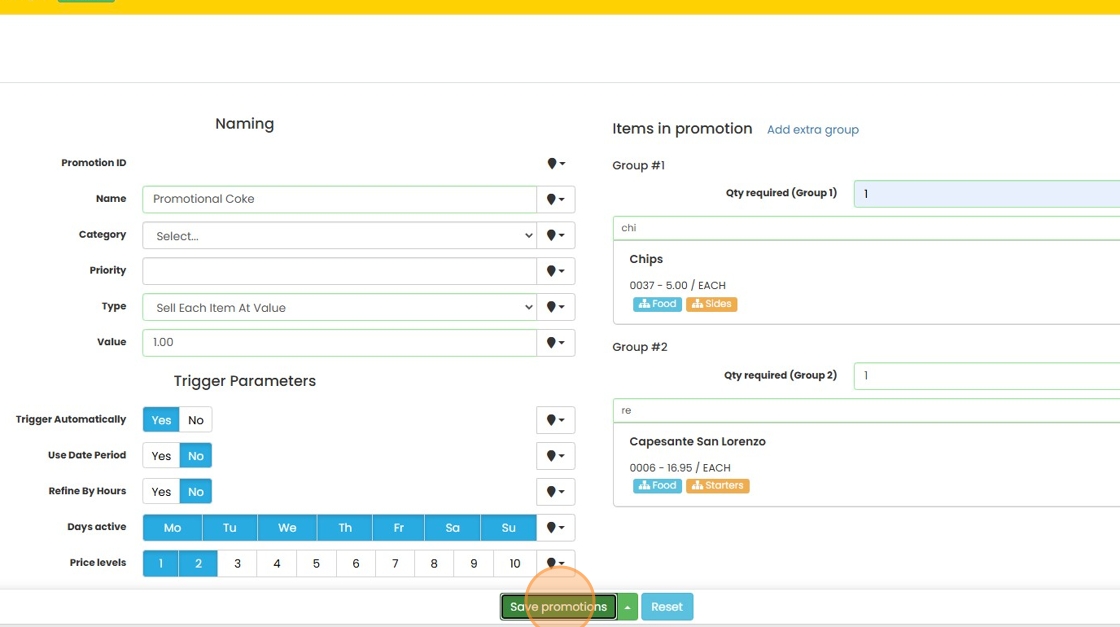
    Setting Up Promotions on Cloud


    1. Click “Promotion Setup”
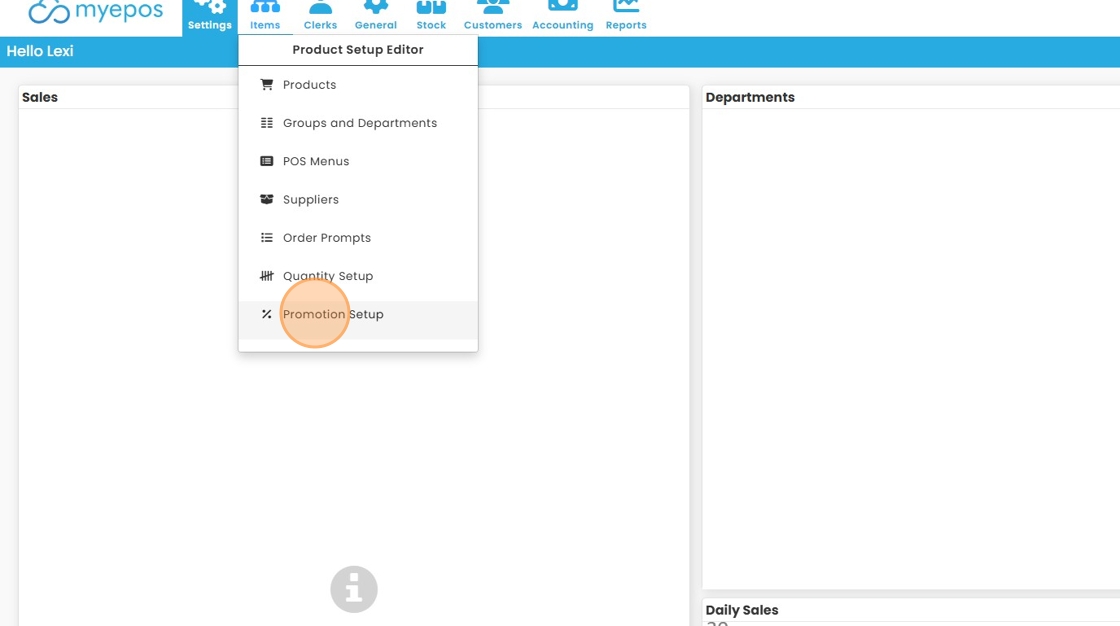
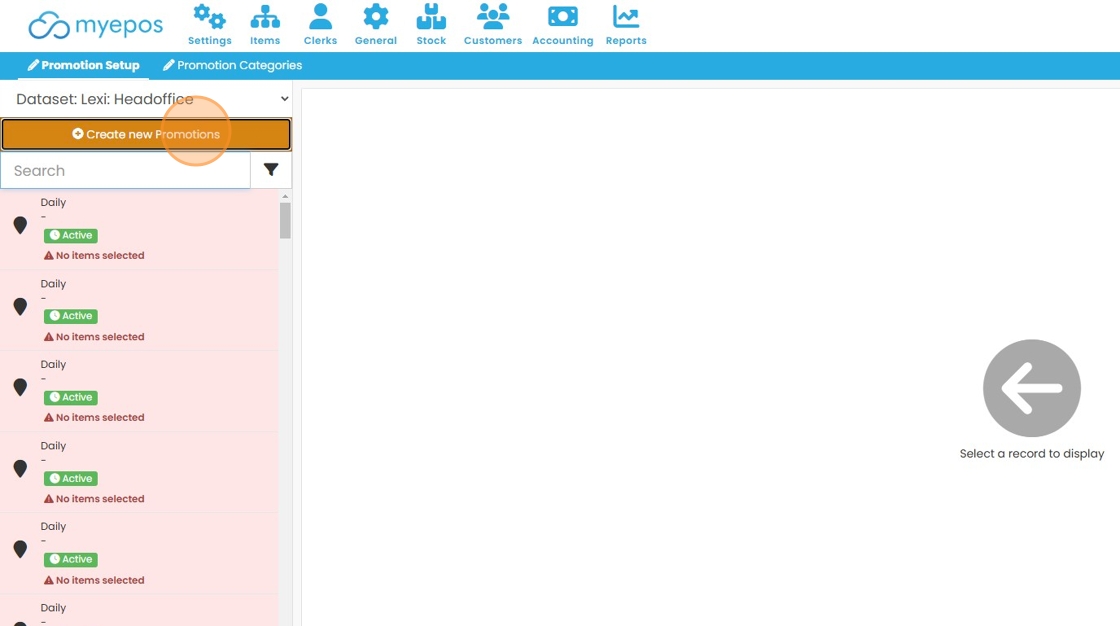
    2. Click “Create new Promotions”
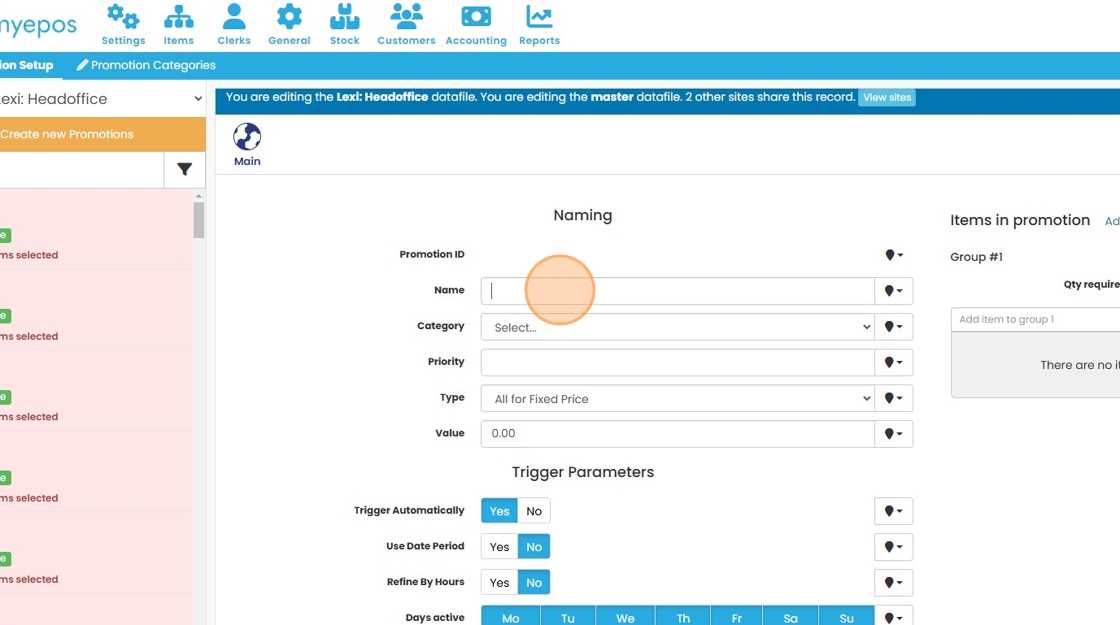
    3. Give your promotion a name
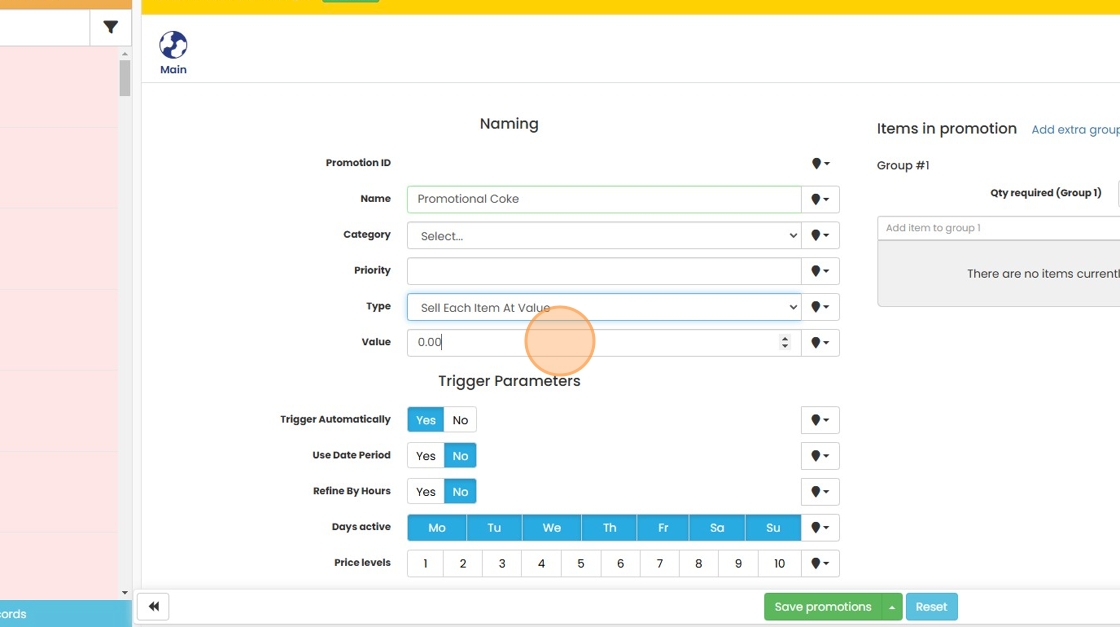
    4. Choose your Promotion Type

    5. The “Cheapest Item Is Free” option is the perfect way to set up a buy one get one free promotion OR a 3 for 2 promotion.

    6. Click the “Value” field, for this promotion the value is 0.00 as the item is free
    7. The “All for Fixed Price” option is the perfect way to set up meal deals or set menus.

    8. Click the “Value” field for this promotion the value is the price of the set menu or meal deal.

    9. The “Discount All With Amount” option discounts all valid items by a fixed amount

    10. Click the “Value” field for this promotion the value is the discount you wish to give on all items sold under this promotion.

    11. The “Discount All With %” option discounts all valid items by a percentage

    12. Click the “Value” field for this promotion the value is the discount percentage you wish to give on all items sold under this promotion.

    13. The “Discount Cheapest With %” option is the perfect way to set up a buy one get one 50% off promotion.

    14. Click the “Value” field for this promotion the value is the discount percentage you wish to give on the cheapest item sold under this promotion.

    15. The “Trigger Item Is Free” option is perfect for offers such as buy 2 main courses and get a free bottle of wine.
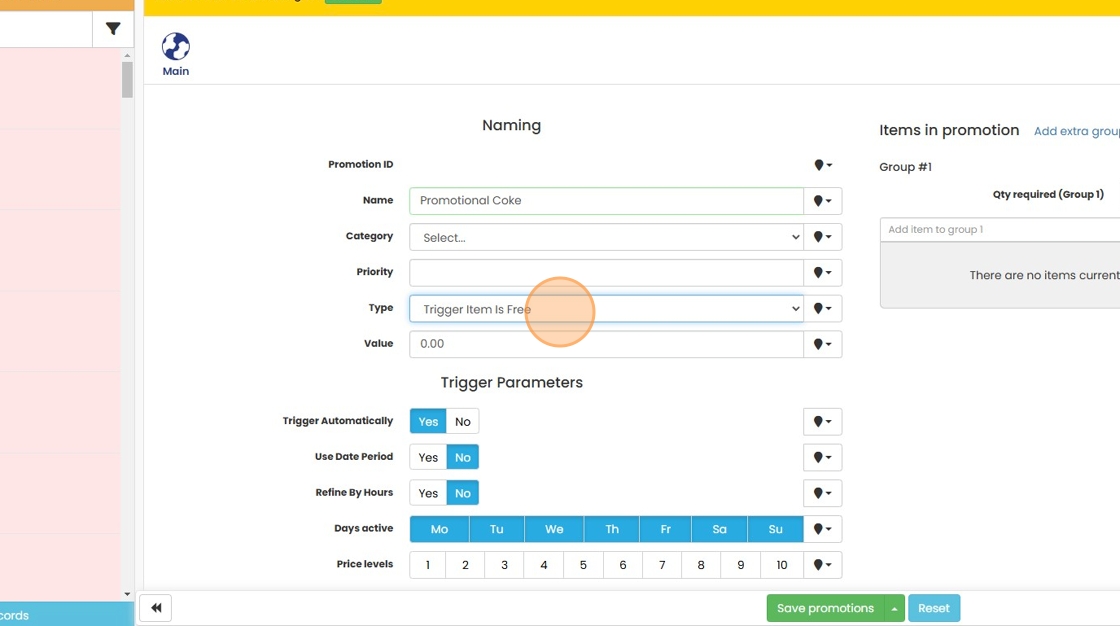
    16. Click the “Value” field for this promotion the value is 0.00 as the trigger item is free.

    17. The “Free Item With Sale Value” option is perfect for offers such as a free tote bag with purchases over £20

    18. Click the “Value” field for this promotion the value is the minimum spend to get the free item

    19. The “Sell Each Item At Value” option is perfect for a happy hour set up where cocktails are £5

    20. Click the “Value” field for this promotion the value is the sell price for items in this promotion.

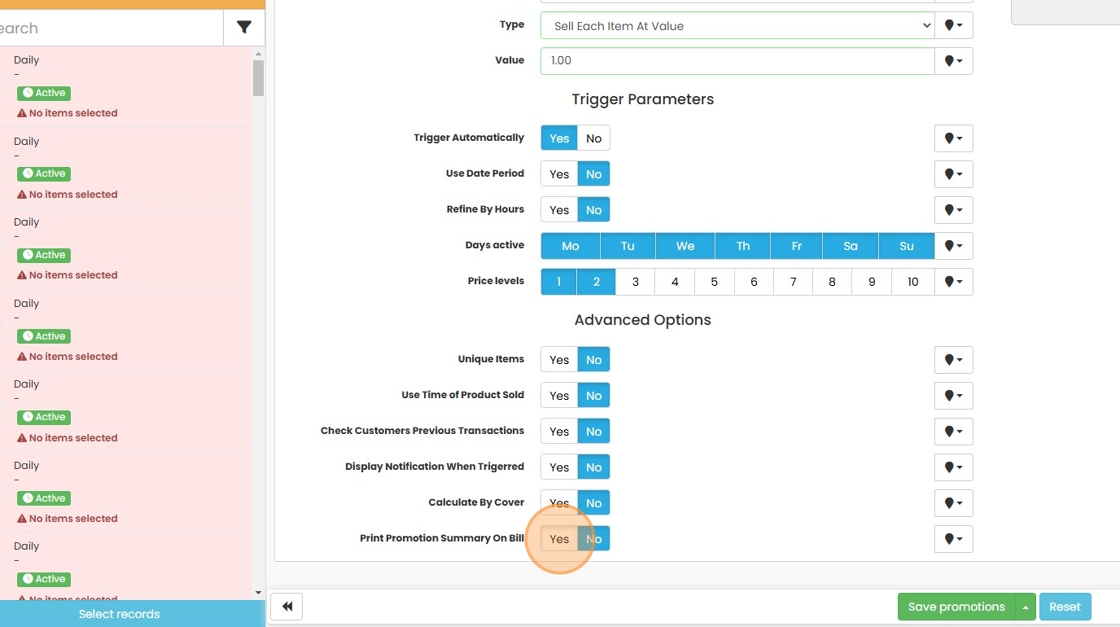
    21. Choose whether the promotion is applied automatically.
    If set to ‘Yes’ the promotion will run automatically once all conditions are met.
    If set to ‘No’ the promotion will only run on a button press so you will need to add the button to your keyboard. Keyboard function is: “Promotion number*PROMOTION”
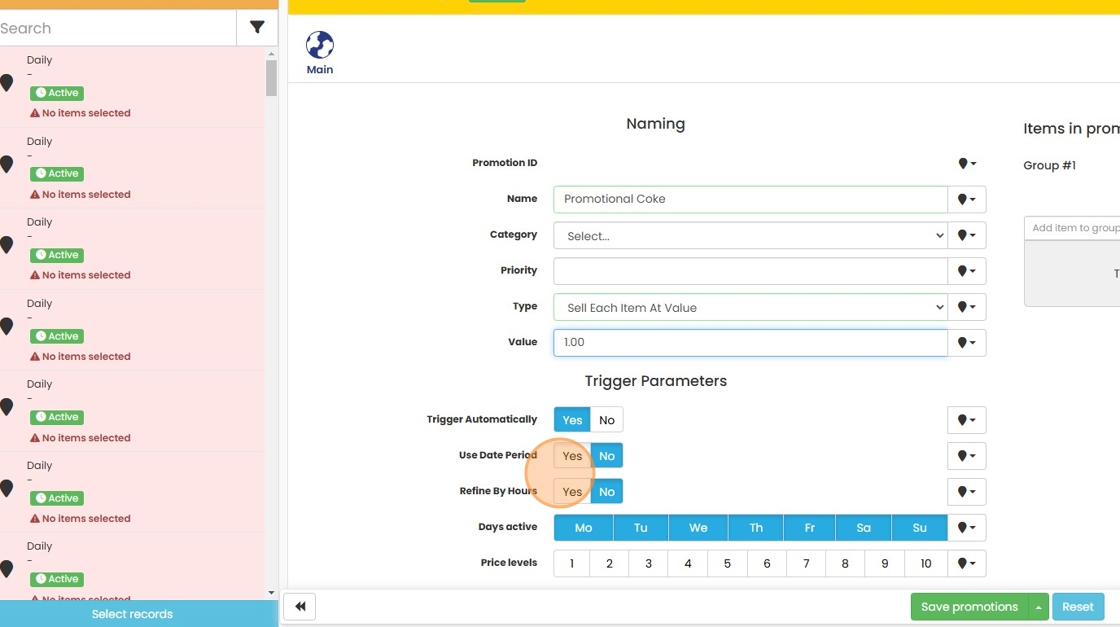
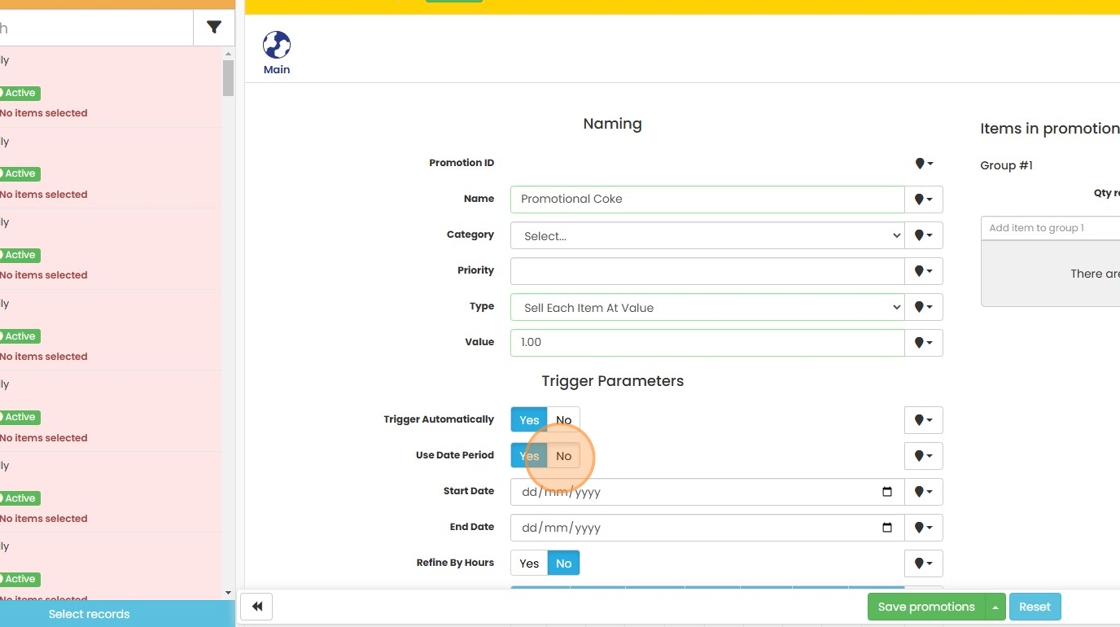
    22. Choose whether the promotion is applied for a specific date range.
    If set to ‘Yes’ you will be presented with a start & end date field so the promotion will only be valid during that period.
    If set to ‘No’ the promotion will run until it is turned off.
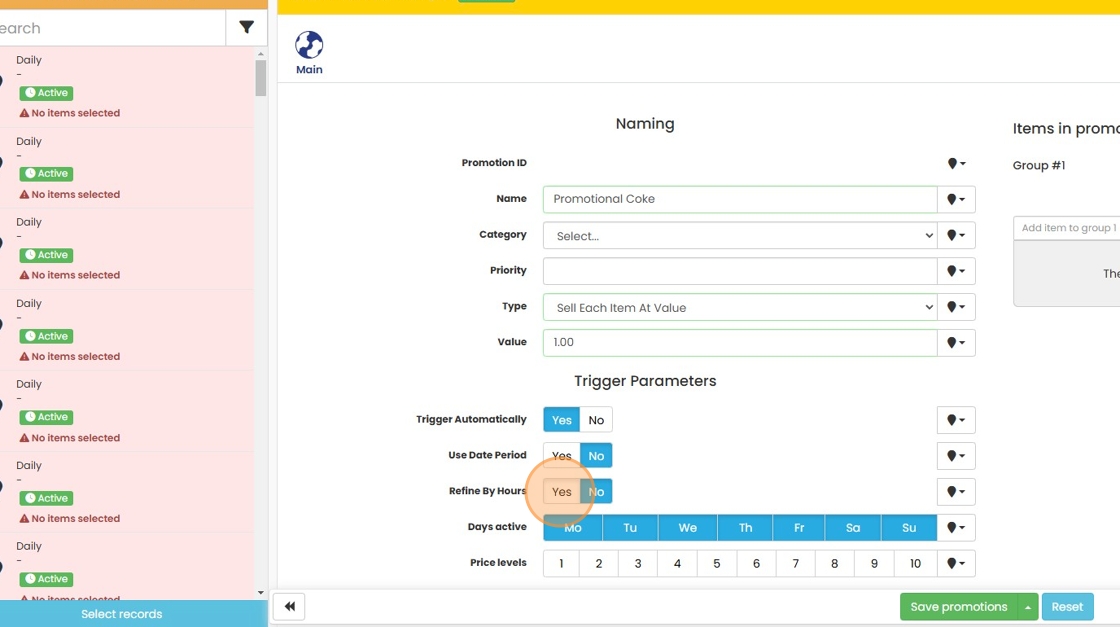
    23. Choose whether the promotion is applied during a specific time period.
    If set to ‘Yes’ you will be presented with a start & end time field so the promotion will only be valid during that period.
    If set to ‘No’ the promotion will run until it is turned off.
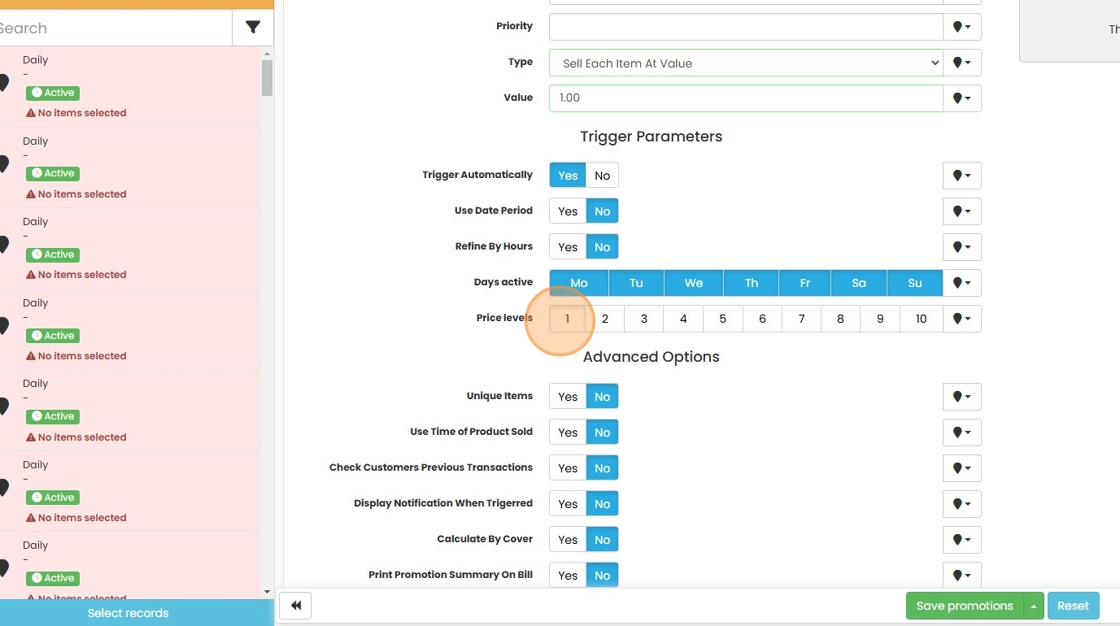
    24. Choose whether the promotion is applied for specific days only.
    Days in Blue are days when the promotion is active; days in white are when it will be inactive.

    25. Choose which price bands the promotion applies to.
    Numbers in Blue are levels when the promotion is active; levels in white are when it will be inactive.
    26. Choose whether the items have to be unique for the promotion to trigger.
    If set to ‘Yes’ duplicate items will not apply; if set to ‘No’ the promotion will apply with multiples of the same items.

    27. Choose whether the promotion should take into account the time the items were sold vs. paid for.
    If set to ‘Yes’, it will use the time items were rang into the till; if set to ‘No’, it will use the current time when the sale is completed.

    28. Choose whether the promotion should take into account customers’ previous orders.
    If set to ‘Yes’, it will check the customer’s account sales history; if set to ‘No’, only the current sale is considered.

    29. Choose whether staff should be notified when the promotion is triggered.
    If set to ‘Yes’, a message box will pop up on the system; if set to ‘No’, no notification is shown.

    30. Choose whether the promotion should be calculated by cover.
    If set to ‘Yes’, it will check the covers before applying the promotion; if set to ‘No’, it will process as normal.

    31. Choose whether the promotion should print a promotional breakdown on the bill.
    If set to ‘Yes’, a breakdown will be printed on bills/receipts; if set to ‘No’, it will process as normal.
    32. Add the qty of items required for the promotion in “Qty required (Group 1)” field.

    33. Add the relevant items for the promotion in the “Add item to group 1” field.
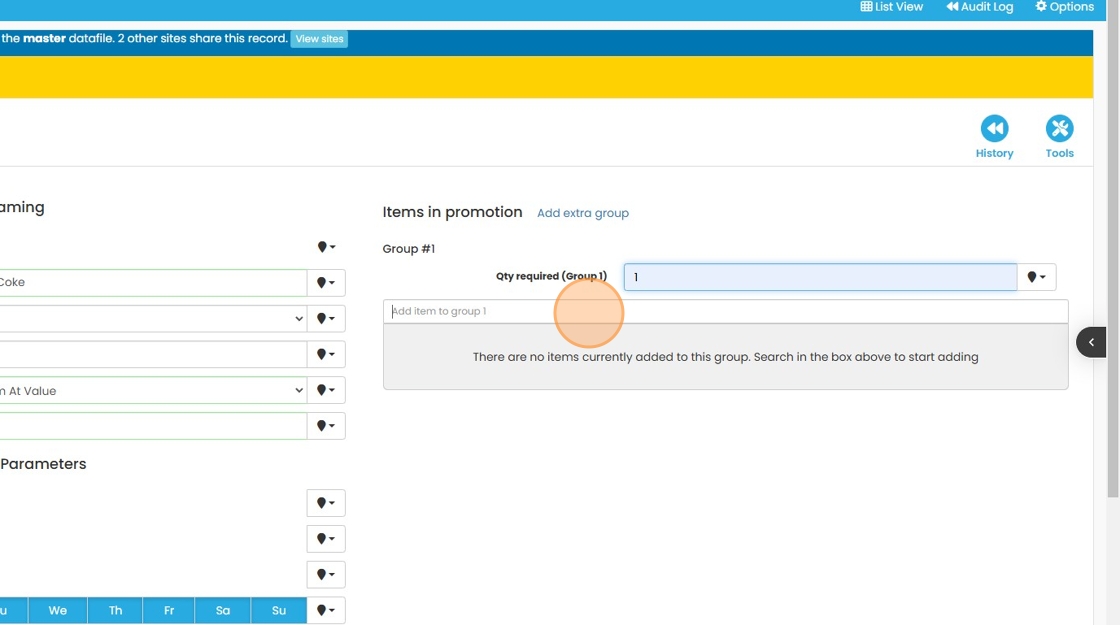
    34. If required, click “Add extra group” to get additional baskets for your promotion
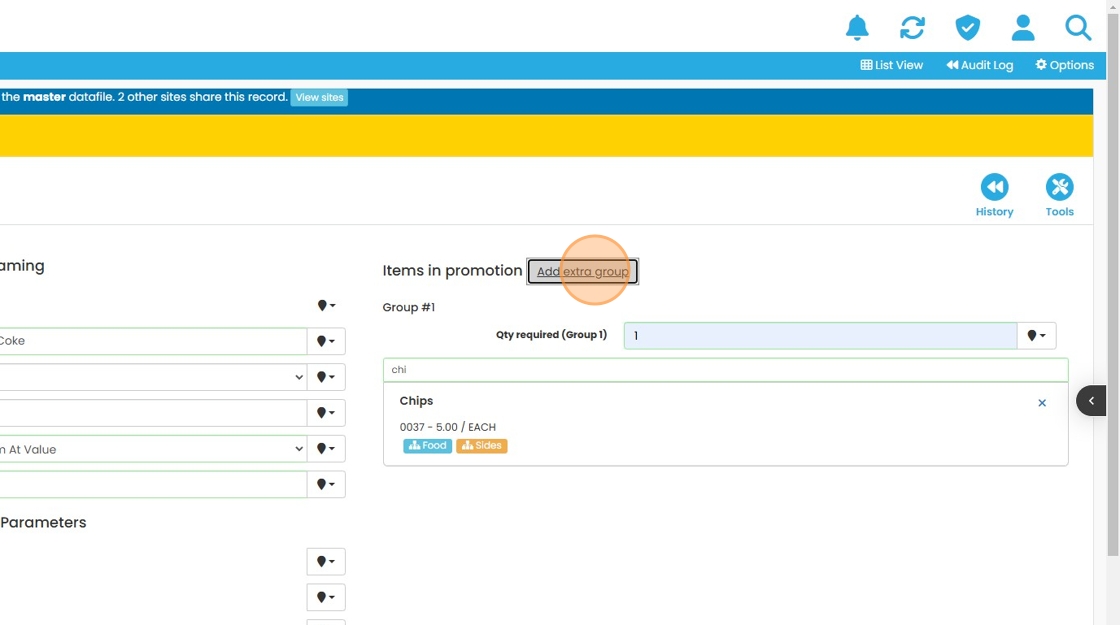
    35. Add the qty of items required for the promotion in “Qty required (Group 2)” field.
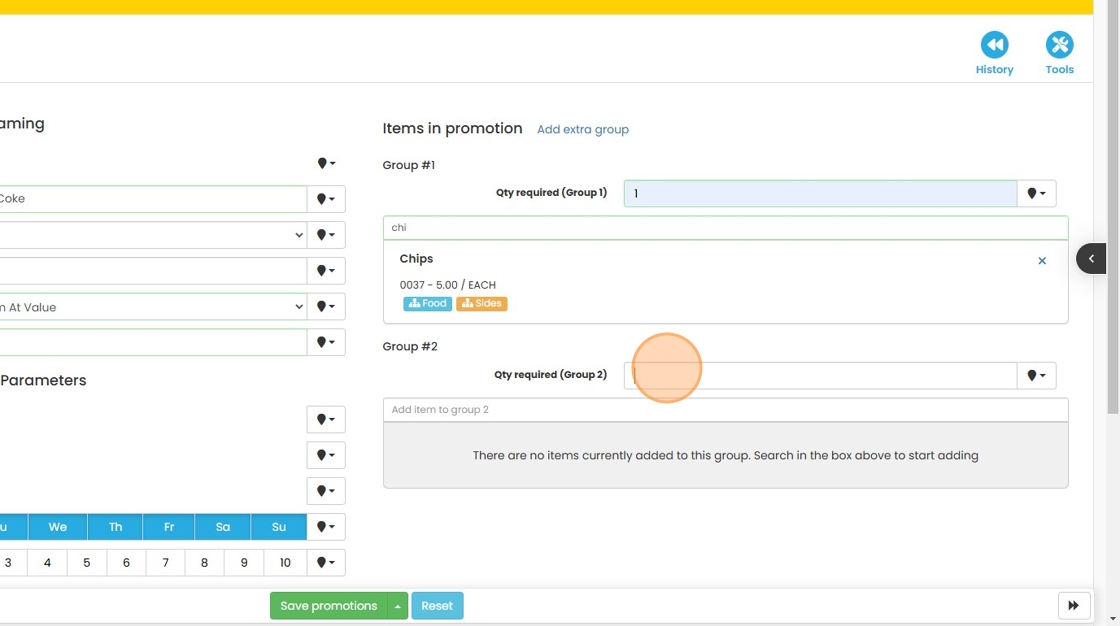
    36. Add the relevant items for the promotion in the “Add item to group 2” field.

    37. Once complete, hit “Save Promotion”
  • Configure Dallas Keys

    Configure Dallas Keys

    This guide provides a straightforward, step-by-step process for configuring Dallas Keys, making it easy for users to follow along and complete the setup efficiently. By following the instructions, users can ensure that their settings are properly adjusted and saved, enhancing their overall experience. Whether you’re new to the system or need a quick refresher, this guide simplifies the configuration process.


    1. In system settings search for “Dallas”

    2. Enable Dallas Keys – Set to yes

    3. Click “Update Setting”

    4. Search for “Hotcode”

    5. Select the setting

    6. Remove the Dallas key from the reader.

    7. Click “Update Setting”

    8. Click “Save”

    9. To assign Dallas Keys to a user

    10. Click “Staff Setup”

    11. Click “User”

    12. Click in the iButton/ Card Box

    13. Tap the Dallas key to the reader

    14. Click “Save”

    15. Click “Exit”

    16. You can now use the Dallas key to log onto the till system as that user

  • Create Order Options

    Create condiment Options

    This guide provides a comprehensive step-by-step process for setting up condiment options in an ordering system, making it essential for anyone involved in managing menu items. By following the instructions, users can enhance their ordering experience through effective upselling and customization prompts. The guide simplifies what can often be a complex task, ensuring that both users and customers benefit from a streamlined process. It is a valuable resource for improving menu management and customer satisfaction.


    Order Prompts

    Tip: Order Prompts are simple questions that will pop up when an item is ordered, there can either be priced (Upselling to a large drink!) or Free (cooking instructions for Steak) They do not track stock

    1. To create an order prompt go to item setup

    2. Click “Order Prompt Setup”

    3. Click “New”

    4. Give your order prompt a name

    5. Insert your option names along with any pricing

    6. With “Show in sub menus” selected the options list will pop up if the item is sold from a submenu.

    7. With “Modifiers List” Selected you will be presented with options such as “Without” “With” and “Extra” when the order prompt is prompted

    8. With “Mandatory Selection” Selection selected stff have to pick an option ot proceed.

    9. Once all of your options are entered and you have made any choices required. Click “Save”

    10. Click “Exit”

    11. To assign the orderprompt to an item first find it in item setup as normal.

    12. Click “Order Options”

    13. Click “Order Prompts” Drop down and select the prompt you wish to add

    14. Click “Save”

    15. Now when you sell the item you will be presented with the option list.

    16. Click “Select”

    Sub/ Pos Menus

    Tip: Pos Menus or Sub Menus are a way to link items together in the same was as an order prompt but they do track stock.

    17. To create a pos/ Sub Menu go to item setup

    18. Search for the item you wish to add the menu to

    19. Click “Use Sub Menus”

    20. Click “Sub Menus”

    21. Click “Department”

    22. Choose the department you wish to link to the item

    23. Click “Select”

    24. With “Follow PriceBand of Main Item” ticked the sub menu items will follow the price band of the main item. i.e. if you are a members club with members rates in price band 2 all sub menu items will also be sold at price band 2.

    25. With “Follow Discount Rules of Main Item” ticked the sub menu items will follow the discount rule of the main item i.e. if you have the main item set to not allow discounts any items sold via sub menu will also not allow discounts

    26. With “Append Cost and Sales Price of Items Sold in Sub Menus to Base Product?” ticked items sold will add to the cost of the original item in the journal/ sales window making the main item more expensive without showing th eadditional cost.

    27. Click “Save”

    28. Click “Save”

    29. Now when you sell the item you will be presented with the sub menu.

    30. Choose which items you want to add

    31. Click “Finish”

  • Setup Cloud for Stock

    Enable Cloud Stock in MyEPOS Cloud

    This guide provides a straightforward process for enabling Cloud Stock in MyEPOS Cloud, ensuring that all products are properly tracked and managed for inventory. By following the steps outlined, users can efficiently set the stock flag and enable stock calculations, streamlining inventory management and improving operational efficiency. Viewing this guide will help users leverage the full capabilities of the MyEPOS Cloud platform with ease.


    1. Click “Utilities”

    2. Click “Set Stock Flag on All ProductsSet the “calculate stock” option to “yes” on all products”

    3. Click the Site you wish to set stock to yes to track stock

    4. Enter code provided by dealer

    5. Click “Enable all products”

    6. Once complete tick “Convert Product Stock”

    7. Enter the code provided by your dealer

    8. Click “Convert”

  • Creating a Purchase Order

    Creating a Purchase Order in myEPOS Cloud


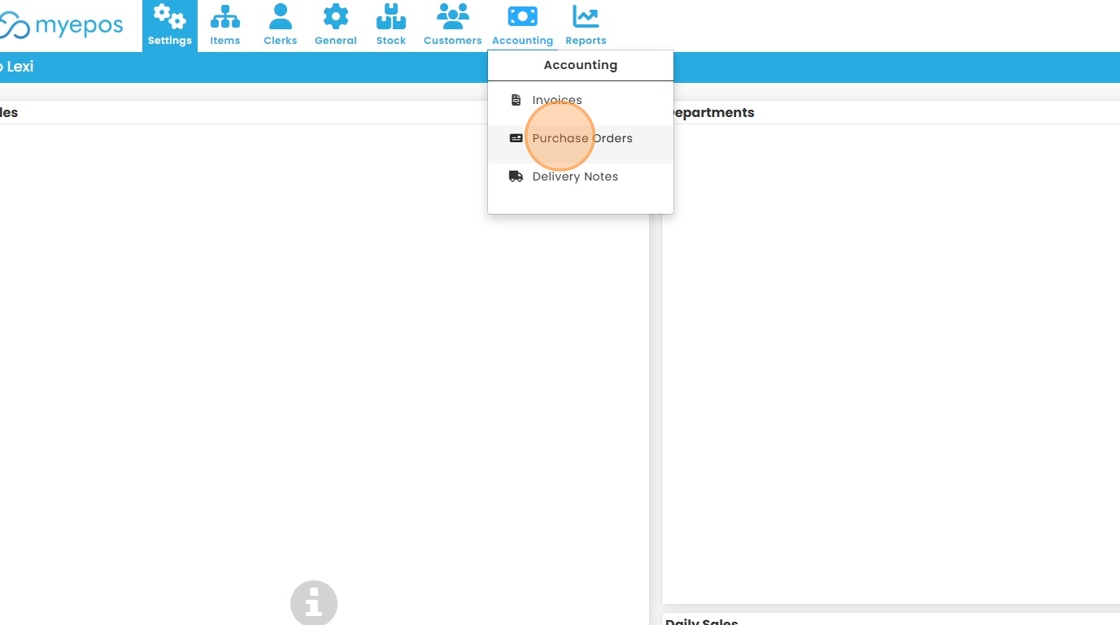
    1. Click “Purchase Orders”

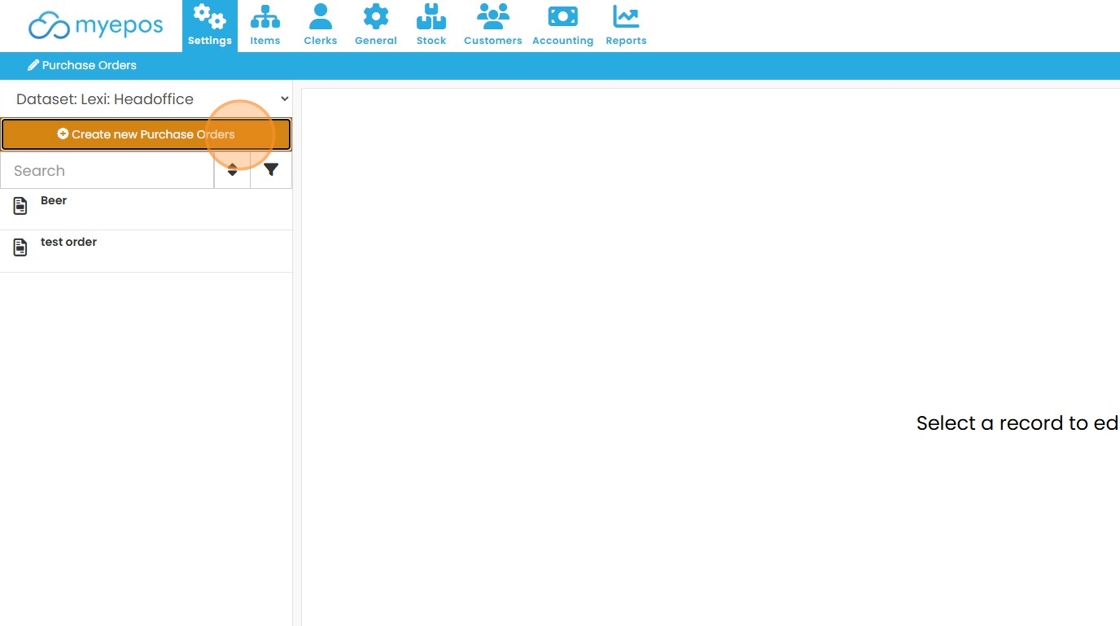
    2. Click “Create new Purchase Orders”

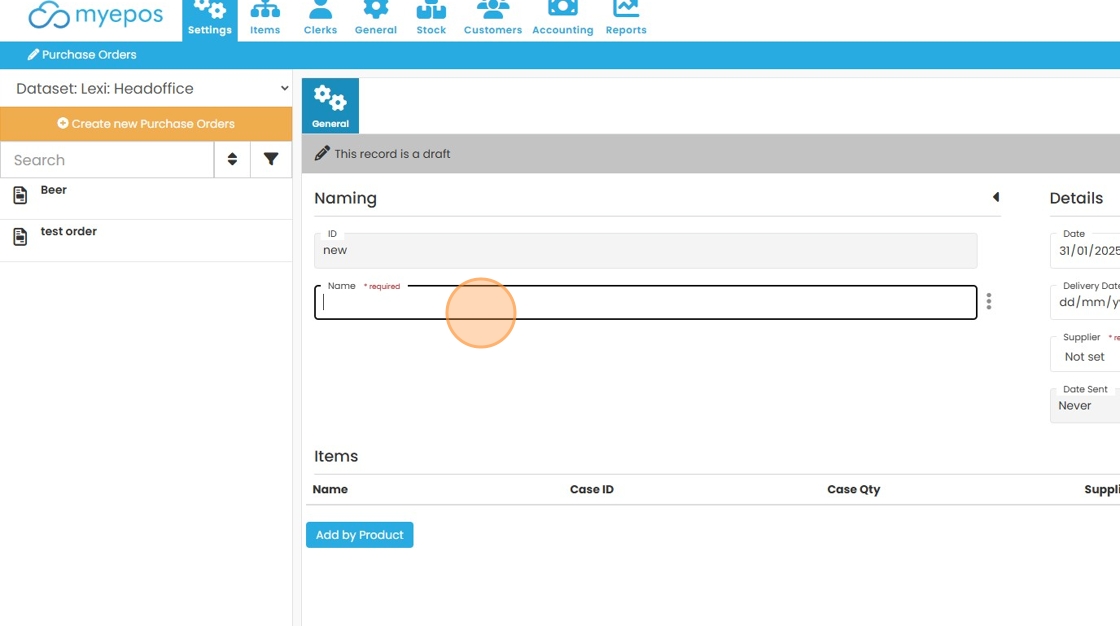
    3. Name your purchase order

    4. Choose the supplier

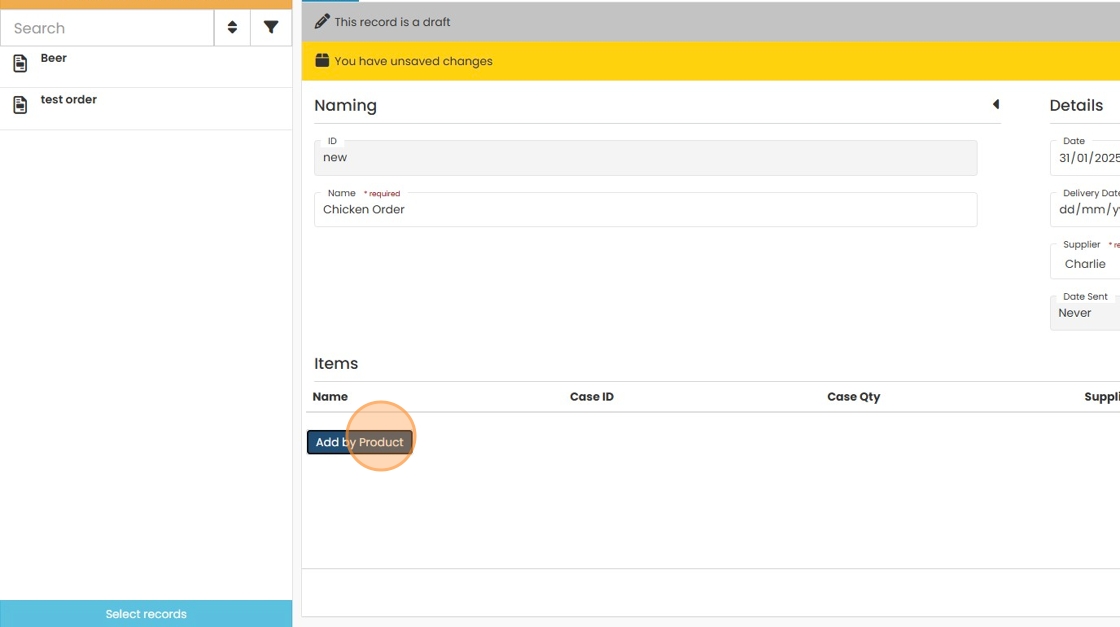
    5. Click “Add by Product”

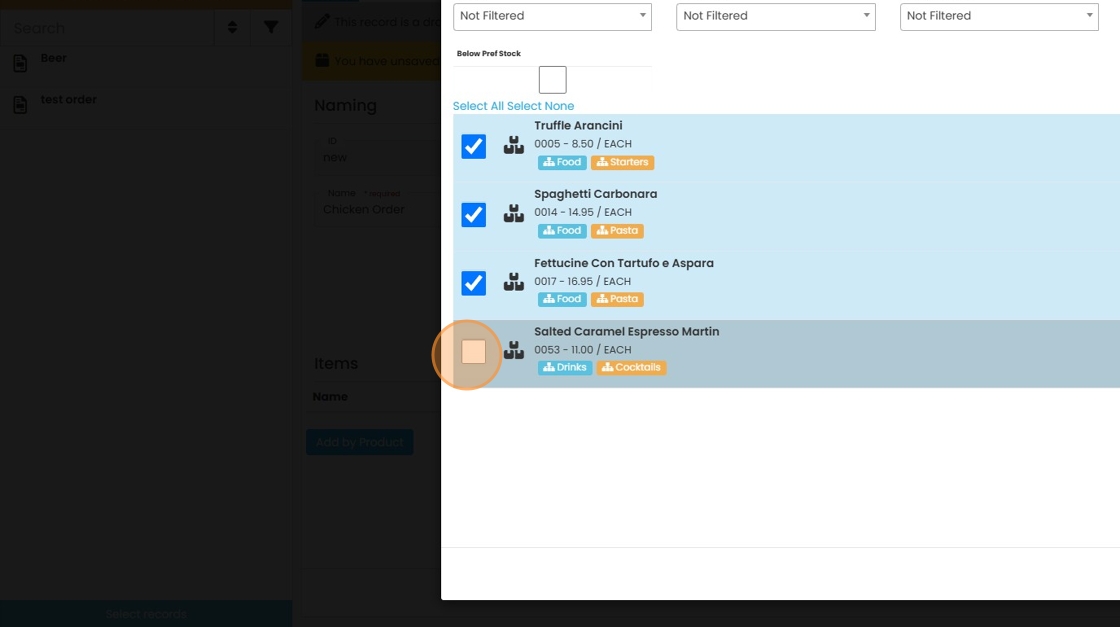
    6. Search for and select the products you wish to order

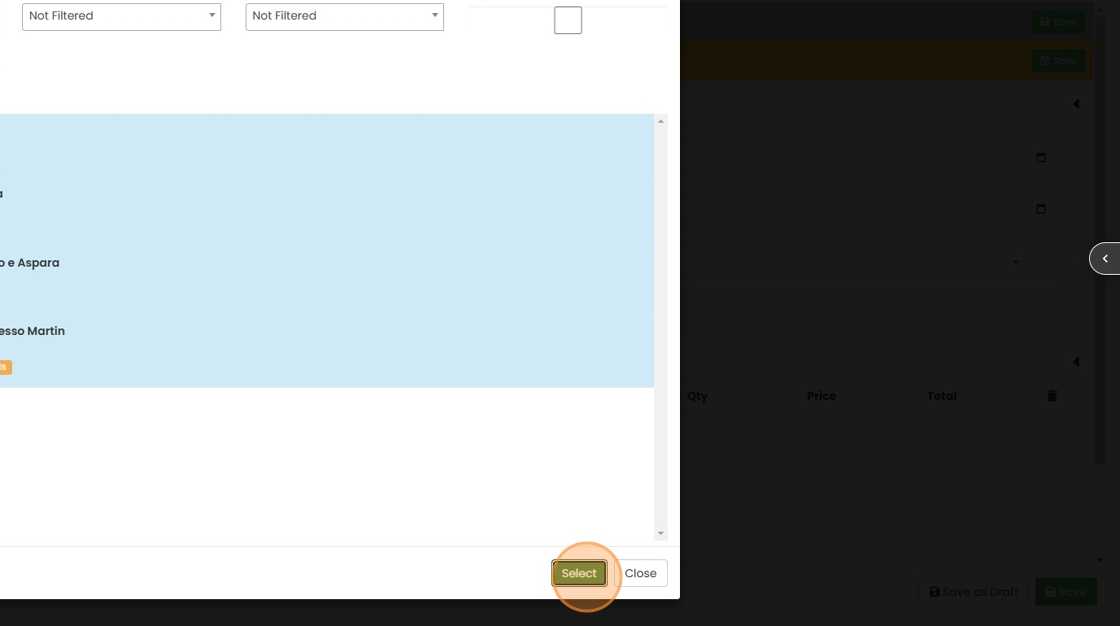
    7. Click “Select”

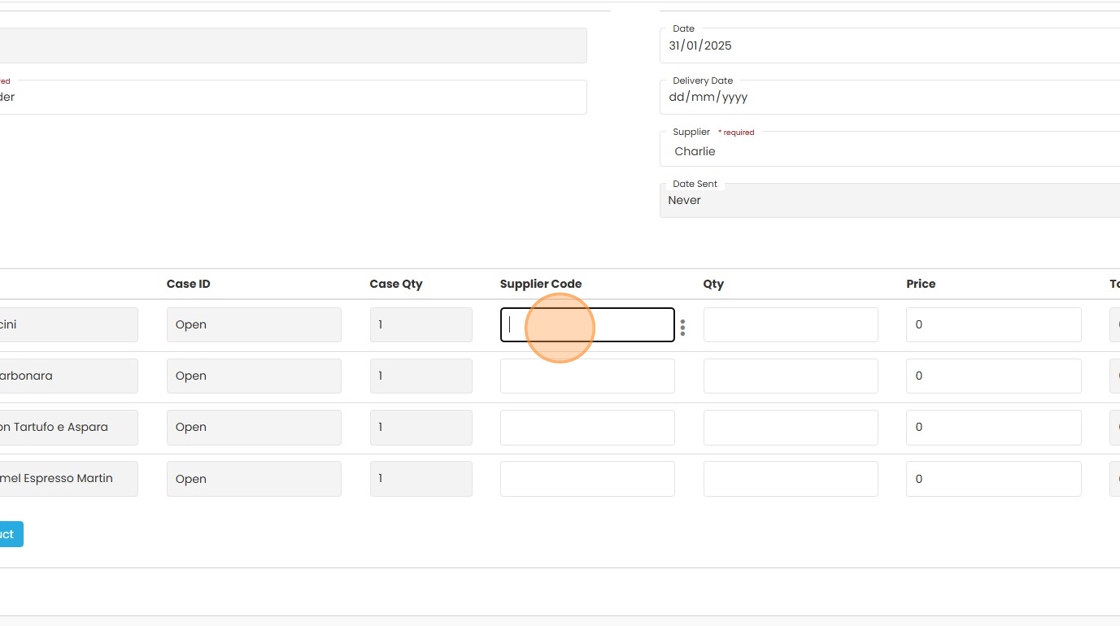
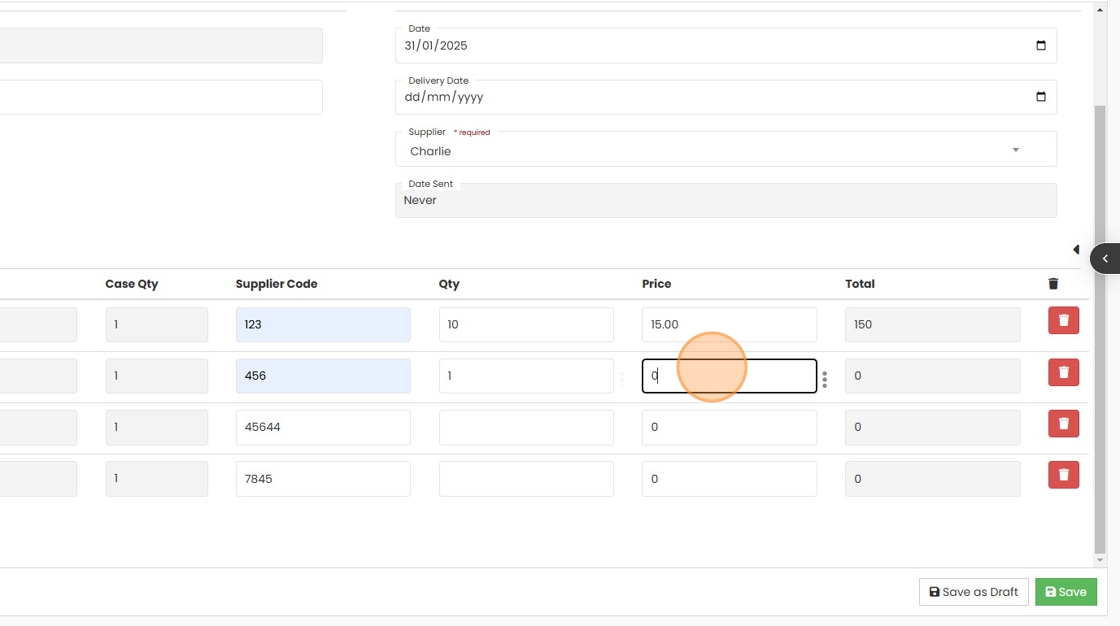
    8. Enter the Supplier Code for the item if not auto populated

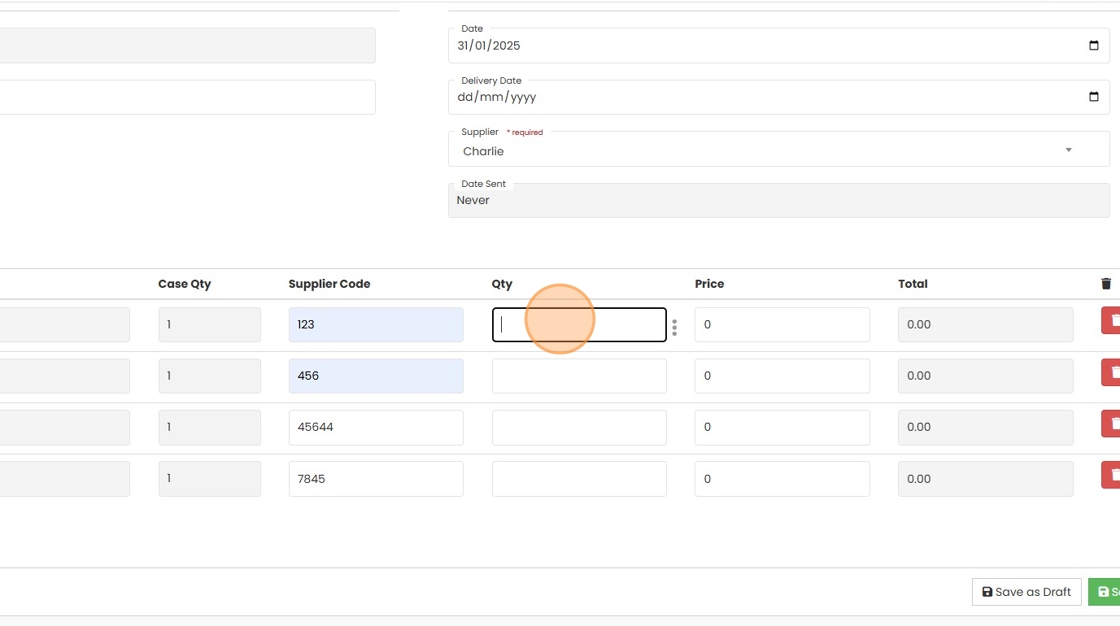
    9. Enter the Qty for this order

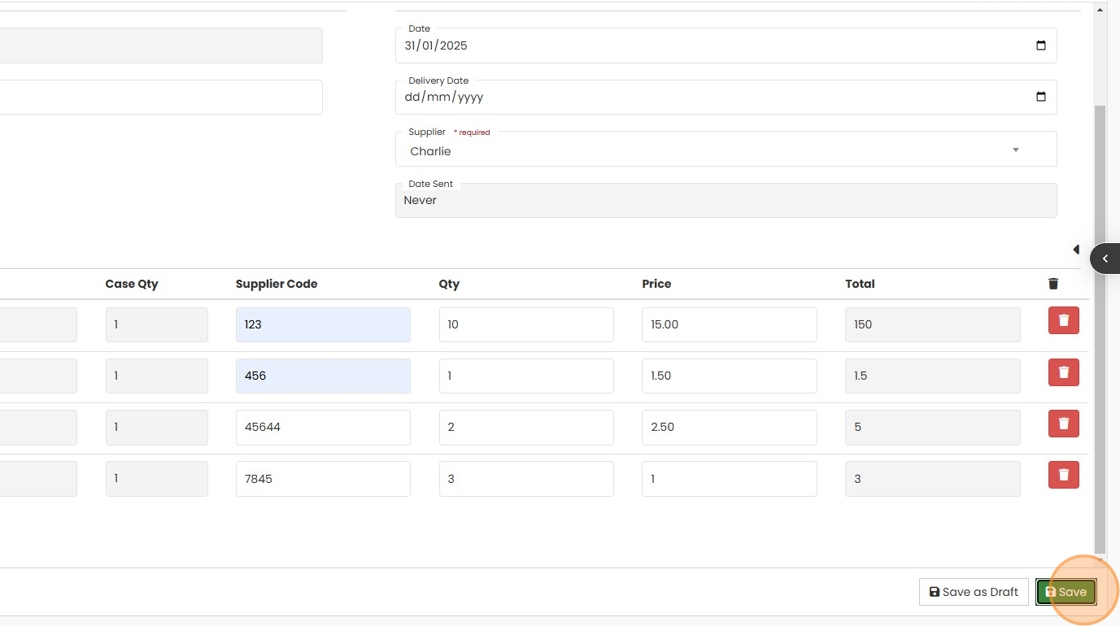
    10. Enter the Price for this order

    11. Click “Save”

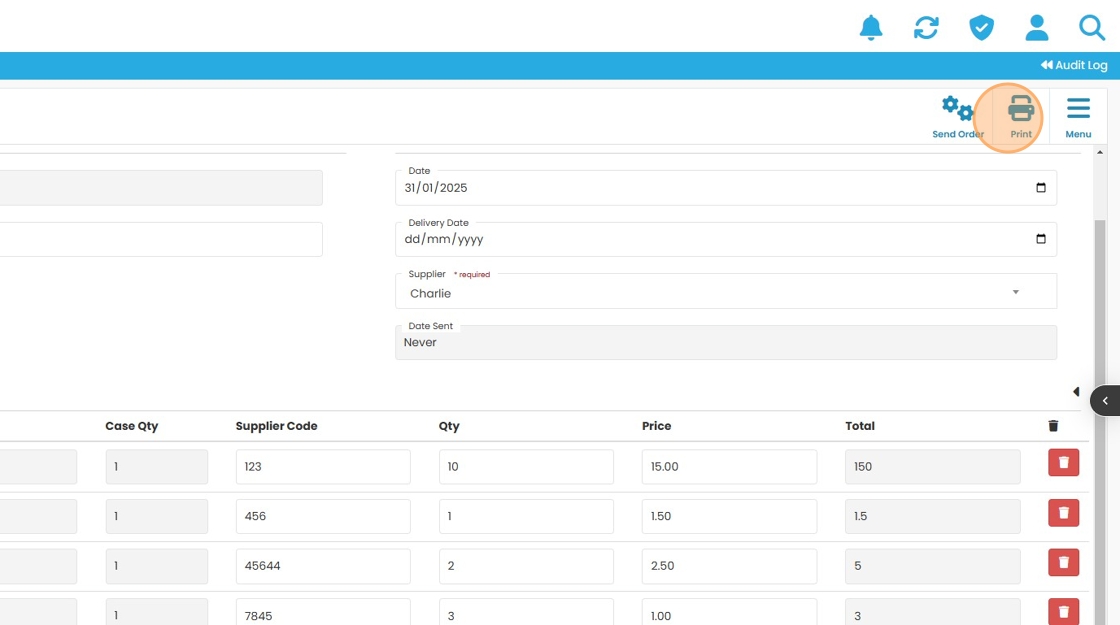
    12. Click Print to generate PDF to send to the supplier.